![]()
Sparen's Danmakufu ph3 Tutorials Extra Lesson 6 - Libraries: Dialogue System
Table of Contents
- Part 1: What will be Covered in this Lesson?
- Part 2: How do Scripts, Functions, Tasks, and Subroutines interact?
- Part 3: How do I create a framework for dialogue events?
- Part 4: How do I handle player input and event control in dialogue events?
- Part 5: How do I handle graphical manipulation in dialogue events?
- Part 6: How do I handle text manipulation in dialogue events?
- Summary
- Sources and External Resources
Part 1: What will be Covered in this Lesson?
In this lesson, we will build a library for building dialogue events in Danmakufu in such a way that such dialogue events can be seamlessly integrated into a Single or Stage without interfering with the remainder of gameplay. We will use a simple text box + two portrait approach for this tutorial - by this point you should be more than capable of extending it however you want to.
This lesson requires understanding of Danmakufu's 2D sprite and text objects as they are key components of a dialogue system. It also requires understanding of how key input works (as that is how progress is made in a dialogue sequence) so if you are unfamiliar, please refer to Lesson 32.
For this project, we will build off of the default system. We will work in three separate files: a stage script, a single script, and a library we will include in all scripts where we want to use the dialogue system.
For the stage, we'll start off with this code, adapted from the ExRumia script.
#TouhouDanmakufu[Stage]
#ScriptVersion[3]
#Title["Tutorial: Dialogue System"]
#Text["Tutorial: Dialogue System"]
#Background["script/default_system/Default_Background_IceMountain.txt"]

#include "./lib_dialogue.dnh"

@Initialize {
    TStage();
}

@MainLoop {
    yield;
}

@Finalize {
}


task TStage {
    let dir = GetCurrentScriptDirectory();

    let path = dir ~ "ExRumia_Plural.txt";
    let idScript = LoadScriptInThread(path);
    loop(60){yield;}
    StartScript(idScript);

    while(!IsCloseScript(idScript) && GetPlayerState() != STATE_END) {
        yield;
    }

    loop(240){yield;}

    CloseStgScene();
}
For the Single, we will do something similar and use a stripped down version of the ExRumia example.
#include "./lib_dialogue.dnh"

let objEnemy;
@Initialize {
    objEnemy = ObjEnemy_Create(OBJ_ENEMY_BOSS);
    ObjEnemy_Regist(objEnemy);
    TEnd;
}

@MainLoop {
    yield;
}

@Event {
    alternative(GetEventType())
    case(EV_REQUEST_LIFE) {
        SetScriptResult(1500);
    }
    case(EV_REQUEST_TIMER) {
        SetScriptResult(60);
    }
}

task TEnd {
    while(ObjEnemy_GetInfo(objEnemy, INFO_LIFE) > 0) {
        yield;
    }
    DeleteShotAll(TYPE_ALL, TYPE_ITEM);
    Obj_Delete(objEnemy);
    loop(30){yield;}
    CloseScript(GetOwnScriptID());
}
You will need a Plural script to run, as long as it runs the Single and is called from the Stage. In addition, you will need a file to hold the dialogue library - I've called it lib_dialogue.dnh for now. For this tutorial, I'm assuming that everything is in the same directory - please adjust the file paths accordingly based off of your directory structure.
Part 2: How do Scripts, Functions, Tasks, and Subroutines interact?
Let's first consider how we would implement our dialogue. If we consider calling a task like any other, things may seem fine at first but if anything runs after that task (say, stage enemies), it is likely that those enemies will suddenly spawn during the dialogue! We therefore need to take our dialogue, and ensure that no matter how long it is or how long the player spends on the dialogue, the dialogue blocks future code from executing.
But wait a moment! If we're in a stage, we don't want everything to stop! Background, System, etc. However, recall that those are separate scripts running in parallel with the stage, so they will not suddenly 'stop' execution.
For actually performing the blocking, we've already discussed how tasks are not the correct way to do this. And so we are left with functions and subroutines. In this case, where we have no parameters to pass and nothing to really return, they serve the same roles. However, for sake of familiarity, we will utilize functions.
We will be writing two events for this tutorial. The first will be called prior to the boss battle and occur during the stage itself, so we'll have something similar to the following:
task TStage {
    let dir = GetCurrentScriptDirectory();

    let path = dir ~ "ExRumia_Plural.txt";
    let idScript = LoadScriptInThread(path);
    loop(60){yield;}

    StageEvent;

    loop(120){yield;}

    StartScript(idScript);

    while(!IsCloseScript(idScript) && GetPlayerState() != STATE_END) {
        yield;
    }

    loop(240){yield;}

    CloseStgScene();
}

function StageEvent {
    // TODO
}
We can do something similar in our Single, but we will get to that later.
Part 3: How do I create a framework for dialogue events?
Now it's time for us to create that library. This library will need a few things to get started - first, a way to create the relevant objects. For this demonstration, we will use artwork by Dairi featuring Reimu and Reisen. I've resized all of these to 384x384 for the purposes of this tutorial in order to keep file sizes (and therefore, the amount of memory required by Danmakufu to store the cutins) smaller. Download the pack here.
Our initial system will contain just four objects - the text box, the two portraits, and the text above the text box. Adding support for additional portraits (e.g. for player and enemy teams) is a relatively simple extension but will require reserving multiple render priorities so that one player can render above the other. It will not be covered here.
Let's begin with the setup. We'll first create a function CreateDialogueEvent that will create the four objects and return them in an array. Why return them in an array? Because the only way to return multiple values from a function in Danmakufu without using an object as a dictionary is to use an array. Note that they must all be the same type - in this case, object IDs are all integers. We will also create a function DestroyDialogueEvent to handle cleanup.
Note that for this library we will use render priorities 81-83 as we will want portraits to render above the playing field. This means that our top left will be that of the window. Recall that the playing field starts at (32, 16) and ends at (32 + 384, 16 + 448). As a result, the horizontal center of the playing field is 224. We will use this as the axis of symmetry for our objects.
// Returns an array containing the text box 2D Sprite Object, the dialogue text Text Object, the left portrait, and the right portrait
function CreateDialogueEvent {
    // We will want the portraits to render first, as the text will render above the portraits.
    // We will use Render Priorities 81 and 82 for portraits (82 to be used in the case of multiple portraits)
    let imgpathL = GetCurrentScriptDirectory() ~ "./u3l32aimg/reisen1.png";
    let objImgLeft = ObjPrim_Create(OBJ_SPRITE_2D);
    Obj_SetRenderPriorityI(objImgLeft, 81);
    ObjPrim_SetTexture(objImgLeft, imgpathL);
    ObjSprite2D_SetSourceRect(objImgLeft, 0, 0, 384, 384);
    ObjSprite2D_SetDestCenter(objImgLeft);
    ObjRender_SetX(objImgLeft, GetStgFrameLeft() + GetStgFrameWidth()/2 - 100);
    ObjRender_SetY(objImgLeft, 288);

    let imgpathR = GetCurrentScriptDirectory() ~ "./u3l32aimg/reimu1.png";
    let objImgRight = ObjPrim_Create(OBJ_SPRITE_2D);
    Obj_SetRenderPriorityI(objImgRight, 81);
    ObjPrim_SetTexture(objImgRight, imgpathR);
    ObjSprite2D_SetSourceRect(objImgRight, 0, 0, 384, 384);
    ObjSprite2D_SetDestCenter(objImgRight);
    ObjRender_SetX(objImgRight, GetStgFrameLeft() + GetStgFrameWidth()/2 + 100);
    ObjRender_SetY(objImgRight, 288);

    // Prepare text background. We will use render priority 83.
    let TEXTBOX_BUFFER = 16; // Buffers on edges
    let TEXTBOX_WIDTH = GetStgFrameWidth - TEXTBOX_BUFFER*2;
    let TEXTBOX_HEIGHT = 48;
    let objTextBack = ObjPrim_Create(OBJ_SPRITE_2D);
    Obj_SetRenderPriorityI(objTextBack, 83);
    ObjSprite2D_SetSourceRect(objTextBack, 0, 0, 1, 1); // Use default white texture
    ObjSprite2D_SetDestRect(objTextBack, 0, 0, TEXTBOX_WIDTH, TEXTBOX_HEIGHT);
    ObjRender_SetX(objTextBack, GetStgFrameLeft() + TEXTBOX_BUFFER);
    ObjRender_SetY(objTextBack, GetStgFrameTop() + GetStgFrameHeight() - TEXTBOX_HEIGHT - TEXTBOX_BUFFER);
    ObjRender_SetColor(objTextBack, 0, 0, 0);
    ascent(i in 0..30){
        ObjRender_SetAlpha(objTextBack, 192/30*i);
        yield;
    }
    ObjRender_SetAlpha(objTextBack, 192);

    // Prepare text object. We will use render priority 83.
    let TEXT_MARGIN_LR = 8; // Left and Right Margins.
    let TEXT_MARGIN_TOP = 6; // Top Margin
    let TEXT_MAXWIDTH = TEXTBOX_WIDTH - TEXT_MARGIN_LR*2;
    let objText = ObjText_Create();
    ObjText_SetText(objText, "Default[r]Default");
    ObjText_SetFontSize(objText, 15);
    ObjText_SetFontBold(objText, false);
    ObjText_SetFontType(objText, "Helvetica");
    Obj_SetRenderPriorityI(objText, 83);
    ObjText_SetFontColorTop(objText, 255, 255, 255); //Will be altered inside the event
    ObjText_SetFontColorBottom(objText, 255, 255, 255);
    ObjText_SetFontBorderType(objText, BORDER_FULL);
    ObjText_SetFontBorderColor(objText, 255, 255, 255);
    ObjText_SetFontBorderWidth(objText, 1);
    ObjText_SetMaxWidth(objText, TEXT_MAXWIDTH);
    ObjRender_SetX(objText, GetStgFrameLeft() + TEXTBOX_BUFFER + TEXT_MARGIN_LR);
    ObjRender_SetY(objText, GetStgFrameTop() + GetStgFrameHeight() - TEXTBOX_HEIGHT - TEXTBOX_BUFFER + TEXT_MARGIN_TOP);

    return [objTextBack, objText, objImgLeft, objImgRight];
}

// Given an array of object IDs, destroys all of them
function DestroyDialogueEvent(objects) {
    ascent(i in 0..length(objects)) {
        Obj_Delete(objects[i]);
    }
}
OK, so that's a lot of code, or at least it seems that way. Let's step through it.
First, we set up our images. We have a left portrait and a right portrait. We're positioning them relative to that 224 axis we mentioned earlier, hence the Left + Width/2. I've set the deviation to be 100 pixels for now; it will depend on your cutin size and other factors. I've also set a fairly arbitrary y position.
For the textbox, I've defined a buffer size that determines the buffer between the text box and the edges of the playing field. The width of the box is determined accordingly. I've set the box to fade in over time - this provides a visual cue of the event. I haven't set a texture for this box, so it will render as pure white - as a result I've set a color to get it to black.
The text itself follows relatively similar constraints as the text box. We want to set the position nicely inside the box so I've defined some margins. As for the Y position (based off of the top margin), it depends on the font and font size - customize based off of what looks good.
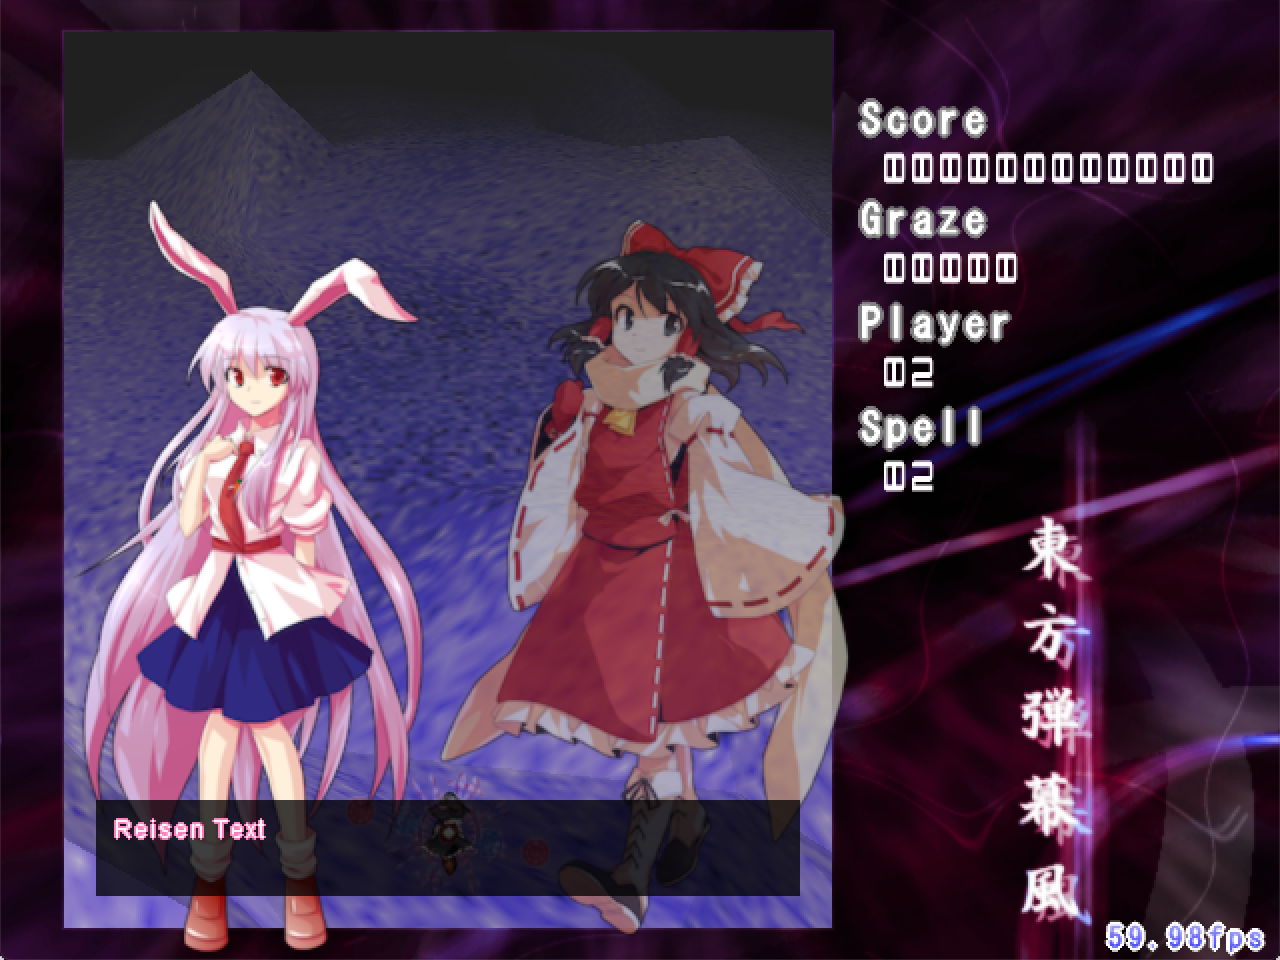
All of this can be rendered by calling CreateDialogueEvent in StageEvent. Below is a sample rendering - note that it will look slightly different on different computers due to font rendering (we will cover this later).

Now that we have a basic framework, we need to be able to actually have an event. To do this, we will need three things: The ability to progress in an event, the ability to change the graphics, and the ability to change the text. We'll cover these in order.
Part 4: How do I handle player input and event control in dialogue events?
In the previous lesson we discussed virtual key states. Any key can be free, pushed, held, or pulled. Generally, there are three cases in an event - the first is the standard 'press the key to proceed'. In this case, as long as the OK virtual key is not free or being held, the dialogue is free to proceed. The next case is a forced wait, common with extra stage midbosses. Here the user's input doesn't matter at all - the dialogue is fully timed. And finally, the case at the very start of an event. Here you want to prevent anything from being skipped. As such, if the OK virtual key is being held at the start of the event, you want to wait for it to be released first and then pressed. We will define these three checks as functions in our library. Note that in each case, we will pass a parameter to these - how many frames to wait for. All of these will be blocking and will prevent execution of the rest of the event until they have passed.
// On player key press, wait specified number of frames
function EventWaitA1(frames) {
    while(GetVirtualKeyState(VK_OK) == KEY_FREE || GetVirtualKeyState(VK_OK) == KEY_HOLD){yield;}
    loop(frames){yield;}
}

// Timed wait for specified number of frames
function EventWaitA2(frames) {
    loop(frames){yield;}
}

// At start of event, wait for key to be released, wait for key to be pressed, and then wait specified number of frames
function EventWaitA3(frames) {
    while(GetVirtualKeyState(VK_OK) == KEY_HOLD){yield;}
    while(GetVirtualKeyState(VK_OK) != KEY_PUSH){yield;}
    loop(frames){yield;}
}
Since these are all blocking, we can use them to control the flow of our event.
Part 5: How do I handle graphical manipulation in dialogue events?
We now have all the tools we need. Let's build our event. Let's start out with a skeleton.
function StageEvent {
    // Obtain relevant objects
    let dialogueobjects = CreateDialogueEvent();
    let textobj = dialogueobjects[1];
    let leftportrait = dialogueobjects[2];
    let rightportrait = dialogueobjects[3];

    SetForbidPlayerSpell(true);
    SetForbidPlayerShot(true);

    let pathReisen1 = GetCurrentScriptDirectory() ~ "./u3l32aimg/reisen1.png";
    let pathReisen2 = GetCurrentScriptDirectory() ~ "./u3l32aimg/reisen2.png";
    let pathReisen3 = GetCurrentScriptDirectory() ~ "./u3l32aimg/reisen3.png";
    let pathReimu1 = GetCurrentScriptDirectory() ~ "./u3l32aimg/reimu1.png";
    let pathReimu2 = GetCurrentScriptDirectory() ~ "./u3l32aimg/reimu2.png";
    let pathReimu3 = GetCurrentScriptDirectory() ~ "./u3l32aimg/reimu3.png";

    DestroyDialogueEvent(dialogueobjects);
    SetForbidPlayerSpell(false);
    SetForbidPlayerShot(false);
}
Note the use of SetForbidPlayerSpell() and SetForbidPlayerShot() - these enable and disable shooting and bombing during an event.
In the skeleton, we have also extracted the individual objects from CreateDialogueEvent for later use and we've defined all of our paths to the images. Let's begin writing... except that we need a way to tell who's speaking! One way to do this is to use foreground/background contrast. In this case, we'll just set the color and alpha of a given character.
// Sets portrait to background
function SetPortraitToBackground(portrait) {
    ObjRender_SetAlpha(portrait, 192);
    ObjRender_SetColor(portrait, 192, 192, 192);
}

// Sets portrait to foreground
function SetPortraitToForeground(portrait) {
    ObjRender_SetAlpha(portrait, 255);
    ObjRender_SetColor(portrait, 255, 255, 255);
}
Now we can tell who's talking. See an example below:
function StageEvent {
    // Obtain relevant objects
    let dialogueobjects = CreateDialogueEvent();
    let textobj = dialogueobjects[1];
    let leftportrait = dialogueobjects[2];
    let rightportrait = dialogueobjects[3];

    SetForbidPlayerSpell(true);
    SetForbidPlayerShot(true);

    let pathReisen1 = GetCurrentScriptDirectory() ~ "./u3l32aimg/reisen1.png";
    let pathReisen2 = GetCurrentScriptDirectory() ~ "./u3l32aimg/reisen2.png";
    let pathReisen3 = GetCurrentScriptDirectory() ~ "./u3l32aimg/reisen3.png";
    let pathReimu1 = GetCurrentScriptDirectory() ~ "./u3l32aimg/reimu1.png";
    let pathReimu2 = GetCurrentScriptDirectory() ~ "./u3l32aimg/reimu2.png";
    let pathReimu3 = GetCurrentScriptDirectory() ~ "./u3l32aimg/reimu3.png";

    ObjText_SetText(textobj, "Reisen Text");
    ObjText_SetFontBorderColor(textobj, 255, 128, 192);
    SetPortraitToForeground(leftportrait); SetPortraitToBackground(rightportrait);
    EventWaitA3(15);

    ObjText_SetText(textobj, "Reimu Text");
    ObjText_SetFontBorderColor(textobj, 255, 128, 128);
    SetPortraitToForeground(rightportrait); SetPortraitToBackground(leftportrait);
    EventWaitA1(15);

    DestroyDialogueEvent(dialogueobjects);
    SetForbidPlayerSpell(false);
    SetForbidPlayerShot(false);
}
There are a few things to note here. First, I've set the border color of the text object based on the character. The other is that I'm manually setting the portraits to foreground or background. There are many other things you can do - the portraits are 2D sprites, so you can make them spin, flip, etc.
Before we switch to text discussion, there's one last thing to do - actually changing the portraits. Currently we're working off of the defaults, but we'll want to use actual portraits. Let's set those textures.
function StageEvent {
    // Obtain relevant objects
    let dialogueobjects = CreateDialogueEvent();
    let textobj = dialogueobjects[1];
    let leftportrait = dialogueobjects[2];
    let rightportrait = dialogueobjects[3];

    SetForbidPlayerSpell(true);
    SetForbidPlayerShot(true);

    let pathReisen1 = GetCurrentScriptDirectory() ~ "./u3l32aimg/reisen1.png";
    let pathReisen2 = GetCurrentScriptDirectory() ~ "./u3l32aimg/reisen2.png";
    let pathReisen3 = GetCurrentScriptDirectory() ~ "./u3l32aimg/reisen3.png";
    let pathReimu1 = GetCurrentScriptDirectory() ~ "./u3l32aimg/reimu1.png";
    let pathReimu2 = GetCurrentScriptDirectory() ~ "./u3l32aimg/reimu2.png";
    let pathReimu3 = GetCurrentScriptDirectory() ~ "./u3l32aimg/reimu3.png";

    // Set initial textures
    ObjPrim_SetTexture(leftportrait, pathReisen1);
    ObjPrim_SetTexture(rightportrait, pathReimu1);

    ObjText_SetText(textobj, "Hi, Reimu.");
    ObjText_SetFontBorderColor(textobj, 255, 128, 192);
    SetPortraitToForeground(leftportrait); SetPortraitToBackground(rightportrait);
    EventWaitA3(15);

    ObjText_SetText(textobj, "Oh.[r]If it isn't Eirin's favorite guinea pig.");
    ObjText_SetFontBorderColor(textobj, 255, 128, 128);
    ObjPrim_SetTexture(rightportrait, pathReimu2);
    SetPortraitToForeground(rightportrait); SetPortraitToBackground(leftportrait);
    EventWaitA1(15);

    ObjText_SetText(textobj, "Is... that how you see me?");
    ObjText_SetFontBorderColor(textobj, 255, 128, 192);
    ObjPrim_SetTexture(leftportrait, pathReisen3);
    SetPortraitToForeground(leftportrait); SetPortraitToBackground(rightportrait);
    EventWaitA1(15);

    ObjText_SetText(textobj, "Perhaps it is.");
    ObjText_SetFontBorderColor(textobj, 255, 128, 128);
    SetPortraitToForeground(rightportrait); SetPortraitToBackground(leftportrait);
    EventWaitA1(15);

    ObjText_SetText(textobj, "I... see.");
    ObjText_SetFontBorderColor(textobj, 255, 128, 192);
    ObjPrim_SetTexture(leftportrait, pathReisen2);
    SetPortraitToForeground(leftportrait); SetPortraitToBackground(rightportrait);
    EventWaitA1(15);

    ObjText_SetText(textobj, "That's... quite unfortunate.");
    ObjText_SetFontBorderColor(textobj, 255, 128, 192);
    SetPortraitToForeground(leftportrait); SetPortraitToBackground(rightportrait);
    EventWaitA1(15);

    DestroyDialogueEvent(dialogueobjects);
    SetForbidPlayerSpell(false);
    SetForbidPlayerShot(false);
}
Since we've already defined the paths to the images, it becomes a simple matter of setting the textures of the sprites whenever needed. For this same purpose, it is recommended that all of your cutins be the same size so that this type of switch (where source and dect rects aren't manually adjusted during the dialogue) is easy and painless, allowing you to focus more on the event content.
Part 6: How do I handle text manipulation in dialogue events?
Finally, let's discuss text manipulation. We've already done color changing, but there are some other things that can be done - changing font size, crazy text rotation, etc. However, we won't talk about those - instead, we'll talk about fitting the text in the box, cross platform text box support, and text size detection. Fun!
For this, I'll work in the Single script.
#include "./lib_dialogue.dnh"

let objEnemy;
@Initialize {
    objEnemy = ObjEnemy_Create(OBJ_ENEMY_BOSS);
    ObjEnemy_Regist(objEnemy);
    TEnd;
    TEvent;
}

@MainLoop {
    yield;
}

@Event {
    alternative(GetEventType())
    case(EV_REQUEST_LIFE) {
        SetScriptResult(1500);
    }
    case(EV_REQUEST_TIMER) {
        SetScriptResult(60);
    }
}

task TEvent {
    // Obtain relevant objects
    let dialogueobjects = CreateDialogueEvent();
    let textobj = dialogueobjects[1];
    let leftportrait = dialogueobjects[2];
    let rightportrait = dialogueobjects[3];

    SetForbidPlayerSpell(true);
    SetForbidPlayerShot(true);

    let pathReisen1 = GetCurrentScriptDirectory() ~ "./u3l32aimg/reisen1.png";
    let pathReisen2 = GetCurrentScriptDirectory() ~ "./u3l32aimg/reisen2.png";
    let pathReisen3 = GetCurrentScriptDirectory() ~ "./u3l32aimg/reisen3.png";
    let pathReimu1 = GetCurrentScriptDirectory() ~ "./u3l32aimg/reimu1.png";
    let pathReimu2 = GetCurrentScriptDirectory() ~ "./u3l32aimg/reimu2.png";
    let pathReimu3 = GetCurrentScriptDirectory() ~ "./u3l32aimg/reimu3.png";

    // Set initial textures
    ObjPrim_SetTexture(leftportrait, pathReisen1);
    ObjPrim_SetTexture(rightportrait, pathReimu1);

    ObjText_SetText(textobj, "You know, I really think that we need to have a long and meaningful discussion about the relationship between humans and youkai in order to better understand one another and more effectively utilize each others strengths for the continued benefit of Gensokyo society.");
    ObjText_SetFontBorderColor(textobj, 255, 128, 192);
    SetPortraitToForeground(leftportrait); SetPortraitToBackground(rightportrait);
    EventWaitA3(15);

    ObjText_SetText(textobj, "Is that so.");
    ObjText_SetFontBorderColor(textobj, 255, 128, 128);
    ObjPrim_SetTexture(rightportrait, pathReimu2);
    SetPortraitToForeground(rightportrait); SetPortraitToBackground(leftportrait);
    EventWaitA1(15);

    DestroyDialogueEvent(dialogueobjects);
    SetForbidPlayerSpell(false);
    SetForbidPlayerShot(false);

    ObjEnemy_SetLife(objEnemy, -1); // Trigger script end
}

task TEnd {
    while(ObjEnemy_GetInfo(objEnemy, INFO_LIFE) > 0) {
        yield;
    }
    DeleteShotAll(TYPE_ALL, TYPE_ITEM);
    Obj_Delete(objEnemy);
    loop(30){yield;}
    CloseScript(GetOwnScriptID());
}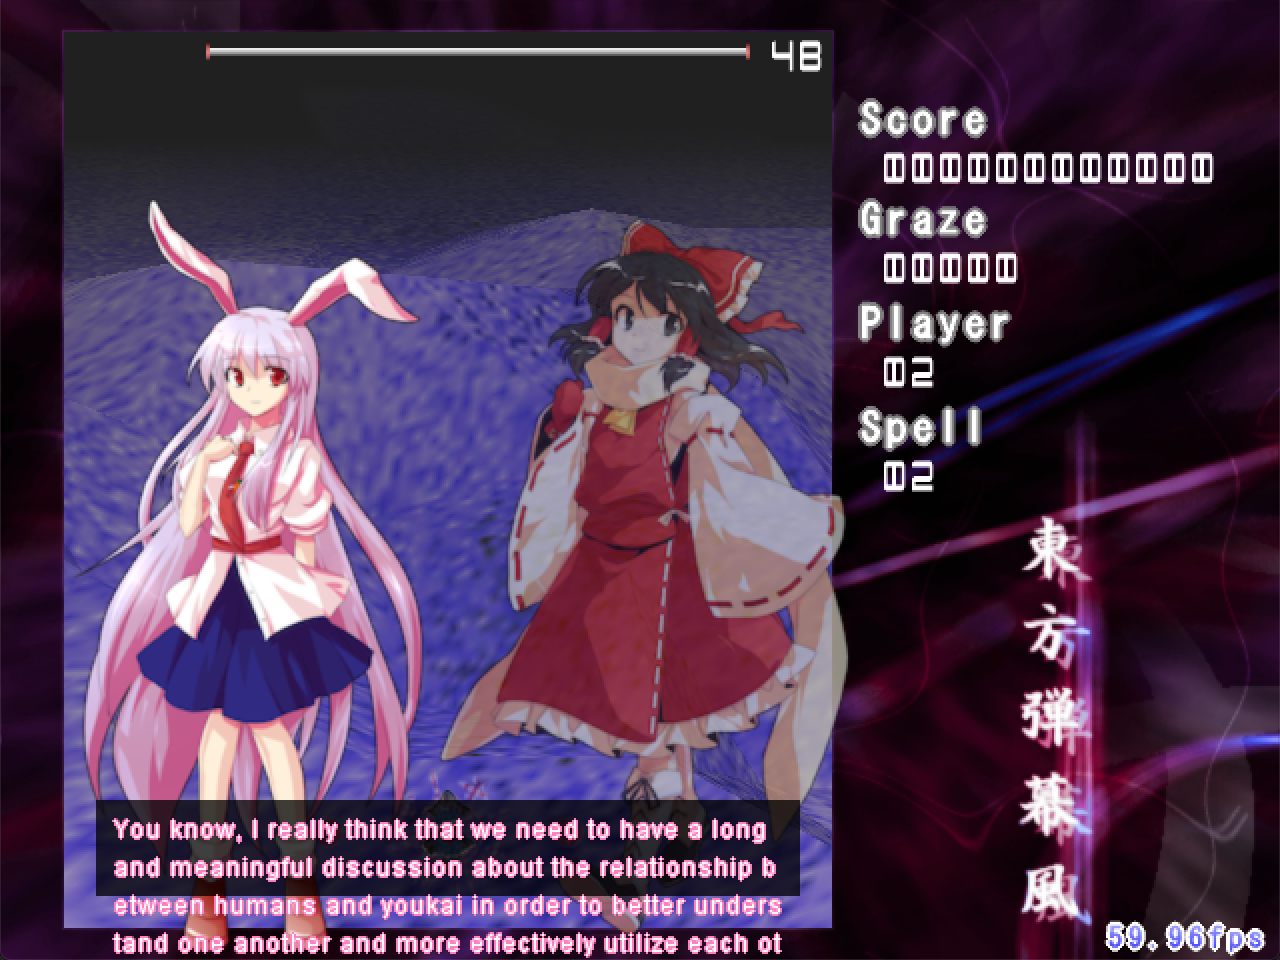
First, there is one issue with the code here - the Single script's timer. At the moment there is nothing preventing the timer from ending and the event along with it. Make sure to keep the timer set, or perform another workaround to ensure that the single doesn't end with the event still rolling. And no, setting the timer to something very large is not an acceptable workaround.
And the second issue - the text doesn't fit. In addition, nothing we do aside from expanding the text box will let it fit. And so we come to a dialogue design point - each line of dialogue should be short and easy to understand. Use multiple lines, and use multiple chunks of dialogue.
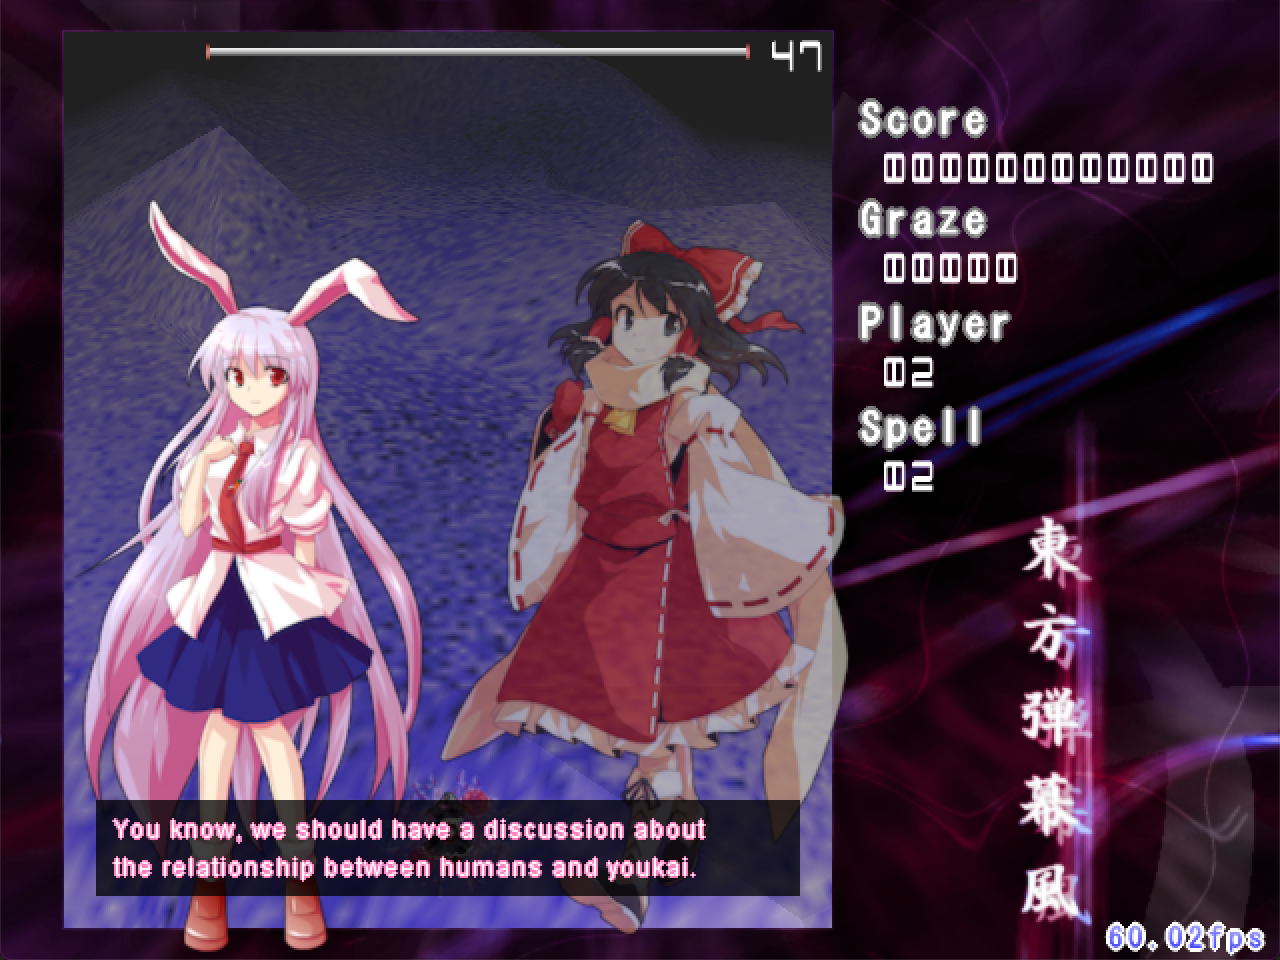
Now this brings us to the next issue - line breaks. For the vast majority of your dialogue, it will be sufficient to use manual line breaks ([r]) like so:
task TEvent {
    // Obtain relevant objects
    let dialogueobjects = CreateDialogueEvent();
    let textobj = dialogueobjects[1];
    let leftportrait = dialogueobjects[2];
    let rightportrait = dialogueobjects[3];

    SetForbidPlayerSpell(true);
    SetForbidPlayerShot(true);

    let pathReisen1 = GetCurrentScriptDirectory() ~ "./u3l32aimg/reisen1.png";
    let pathReisen2 = GetCurrentScriptDirectory() ~ "./u3l32aimg/reisen2.png";
    let pathReisen3 = GetCurrentScriptDirectory() ~ "./u3l32aimg/reisen3.png";
    let pathReimu1 = GetCurrentScriptDirectory() ~ "./u3l32aimg/reimu1.png";
    let pathReimu2 = GetCurrentScriptDirectory() ~ "./u3l32aimg/reimu2.png";
    let pathReimu3 = GetCurrentScriptDirectory() ~ "./u3l32aimg/reimu3.png";

    // Set initial textures
    ObjPrim_SetTexture(leftportrait, pathReisen1);
    ObjPrim_SetTexture(rightportrait, pathReimu1);

    ObjText_SetText(textobj, "You know, we should have a discussion about[r]the relationship between humans and youkai.");
    ObjText_SetFontBorderColor(textobj, 255, 128, 192);
    SetPortraitToForeground(leftportrait); SetPortraitToBackground(rightportrait);
    EventWaitA3(15);

    ObjText_SetText(textobj, "If we can better understand one another...");
    ObjText_SetFontBorderColor(textobj, 255, 128, 192);
    ObjPrim_SetTexture(leftportrait, pathReisen2);
    SetPortraitToForeground(leftportrait); SetPortraitToBackground(rightportrait);
    EventWaitA1(15);

    ObjText_SetText(textobj, "I think that we can more effectively utilize each[r]others strengths.");
    ObjText_SetFontBorderColor(textobj, 255, 128, 192);
    ObjPrim_SetTexture(leftportrait, pathReisen1);
    SetPortraitToForeground(leftportrait); SetPortraitToBackground(rightportrait);
    EventWaitA1(15);

    ObjText_SetText(textobj, "If we can do that, it'll have a lot of benefit[r]for Gensokyo's society.");
    ObjText_SetFontBorderColor(textobj, 255, 128, 192);
    SetPortraitToForeground(leftportrait); SetPortraitToBackground(rightportrait);
    EventWaitA1(15);

    ObjText_SetText(textobj, "Is that so.");
    ObjText_SetFontBorderColor(textobj, 255, 128, 128);
    ObjPrim_SetTexture(rightportrait, pathReimu2);
    SetPortraitToForeground(rightportrait); SetPortraitToBackground(leftportrait);
    EventWaitA1(15);

    DestroyDialogueEvent(dialogueobjects);
    SetForbidPlayerSpell(false);
    SetForbidPlayerShot(false);

    ObjEnemy_SetLife(objEnemy, -1); // Trigger script end
}
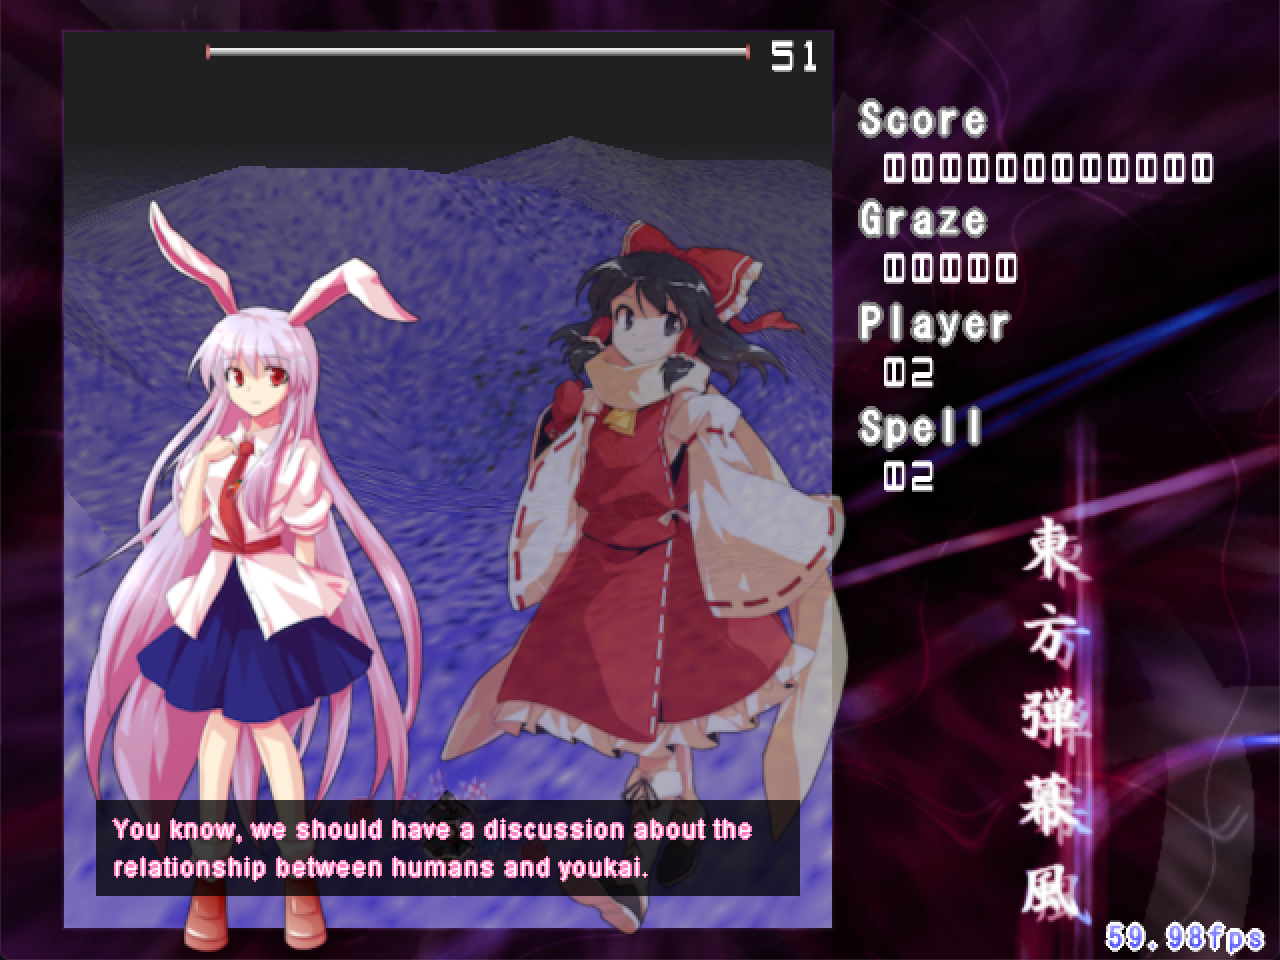
However, for some dialogue it may become annoying to manually insert line breaks. In addition, since fonts render with different widths and spacing on different computers, the only real way to test if the line breaks work as intended is to check the width of each text sequence and insert line breaks automatically based on the local computer's rendering system. The big benefit here is that we can perform line breaks at words rather than at the character level as Danmakufu does by default.
For this, I'll shove some self promotion in and recommend the Text AutoFormat Library. In particular, autoformLineInsertionA2 will be useful here. Note that if you use this library, you must disable setting max width on the Text Object in lib_dialogue.dnh. Otherwise the function will not function properly (since it depends on Danmakufu not automatically performing its own text wrapping first).
task TEvent {
    // Obtain relevant objects
    let dialogueobjects = CreateDialogueEvent();
    let textobj = dialogueobjects[1];
    let leftportrait = dialogueobjects[2];
    let rightportrait = dialogueobjects[3];

    SetForbidPlayerSpell(true);
    SetForbidPlayerShot(true);

    let pathReisen1 = GetCurrentScriptDirectory() ~ "./u3l32aimg/reisen1.png";
    let pathReisen2 = GetCurrentScriptDirectory() ~ "./u3l32aimg/reisen2.png";
    let pathReisen3 = GetCurrentScriptDirectory() ~ "./u3l32aimg/reisen3.png";
    let pathReimu1 = GetCurrentScriptDirectory() ~ "./u3l32aimg/reimu1.png";
    let pathReimu2 = GetCurrentScriptDirectory() ~ "./u3l32aimg/reimu2.png";
    let pathReimu3 = GetCurrentScriptDirectory() ~ "./u3l32aimg/reimu3.png";

    // Set initial textures
    ObjPrim_SetTexture(leftportrait, pathReisen1);
    ObjPrim_SetTexture(rightportrait, pathReimu1);

    let maxwidth = GetStgFrameWidth - 16*2 - 8*2; // same as TEXT_MAXWIDTH in lib_dialogue.dnh

    autoformLineInsertionA2("You know, we should have a discussion about the relationship between humans and youkai.", textobj, maxwidth);
    ObjText_SetFontBorderColor(textobj, 255, 128, 192);
    SetPortraitToForeground(leftportrait); SetPortraitToBackground(rightportrait);
    EventWaitA3(15);

    autoformLineInsertionA2("If we can better understand one another...", textobj, maxwidth);
    ObjText_SetFontBorderColor(textobj, 255, 128, 192);
    ObjPrim_SetTexture(leftportrait, pathReisen2);
    SetPortraitToForeground(leftportrait); SetPortraitToBackground(rightportrait);
    EventWaitA1(15);

    autoformLineInsertionA2("I think that we can more effectively utilize each others strengths.", textobj, maxwidth);
    ObjText_SetFontBorderColor(textobj, 255, 128, 192);
    ObjPrim_SetTexture(leftportrait, pathReisen1);
    SetPortraitToForeground(leftportrait); SetPortraitToBackground(rightportrait);
    EventWaitA1(15);

    autoformLineInsertionA2("If we can do that, it'll have a lot of benefit[r]for Gensokyo's society.", textobj, maxwidth);
    ObjText_SetFontBorderColor(textobj, 255, 128, 192);
    SetPortraitToForeground(leftportrait); SetPortraitToBackground(rightportrait);
    EventWaitA1(15);

    ObjText_SetText(textobj, "Is that so.");
    ObjText_SetFontBorderColor(textobj, 255, 128, 128);
    ObjPrim_SetTexture(rightportrait, pathReimu2);
    SetPortraitToForeground(rightportrait); SetPortraitToBackground(leftportrait);
    EventWaitA1(15);

    DestroyDialogueEvent(dialogueobjects);
    SetForbidPlayerSpell(false);
    SetForbidPlayerShot(false);

    ObjEnemy_SetLife(objEnemy, -1); // Trigger script end
}
And with that, we've produced a functional dialogue library for you to use as a base for further iteration. There are a whole range of things that can be done with dialogue libraries, and it's up to you to see where things will take you.
Our final library is as follows:
// Returns an array containing the text box 2D Sprite Object, the dialogue text Text Object, the left portrait, and the right portrait
function CreateDialogueEvent {
    // We will want the portraits to render first, as the text will render above the portraits.
    // We will use Render Priorities 81 and 82 for portraits (82 to be used in the case of multiple portraits)
    let imgpathL = GetCurrentScriptDirectory() ~ "./u3l32aimg/reisen1.png";
    let objImgLeft = ObjPrim_Create(OBJ_SPRITE_2D);
    Obj_SetRenderPriorityI(objImgLeft, 81);
    ObjPrim_SetTexture(objImgLeft, imgpathL);
    ObjSprite2D_SetSourceRect(objImgLeft, 0, 0, 384, 384);
    ObjSprite2D_SetDestCenter(objImgLeft);
    ObjRender_SetX(objImgLeft, GetStgFrameLeft() + GetStgFrameWidth()/2 - 100);
    ObjRender_SetY(objImgLeft, 288);

    let imgpathR = GetCurrentScriptDirectory() ~ "./u3l32aimg/reimu1.png";
    let objImgRight = ObjPrim_Create(OBJ_SPRITE_2D);
    Obj_SetRenderPriorityI(objImgRight, 81);
    ObjPrim_SetTexture(objImgRight, imgpathR);
    ObjSprite2D_SetSourceRect(objImgRight, 0, 0, 384, 384);
    ObjSprite2D_SetDestCenter(objImgRight);
    ObjRender_SetX(objImgRight, GetStgFrameLeft() + GetStgFrameWidth()/2 + 100);
    ObjRender_SetY(objImgRight, 288);

    // Prepare text background. We will use render priority 83.
    let TEXTBOX_BUFFER = 16; // Buffers on edges
    let TEXTBOX_WIDTH = GetStgFrameWidth - TEXTBOX_BUFFER*2;
    let TEXTBOX_HEIGHT = 48;
    let objTextBack = ObjPrim_Create(OBJ_SPRITE_2D);
    Obj_SetRenderPriorityI(objTextBack, 83);
    ObjSprite2D_SetSourceRect(objTextBack, 0, 0, 1, 1); // Use default white texture
    ObjSprite2D_SetDestRect(objTextBack, 0, 0, TEXTBOX_WIDTH, TEXTBOX_HEIGHT);
    ObjRender_SetX(objTextBack, GetStgFrameLeft() + TEXTBOX_BUFFER);
    ObjRender_SetY(objTextBack, GetStgFrameTop() + GetStgFrameHeight() - TEXTBOX_HEIGHT - TEXTBOX_BUFFER);
    ObjRender_SetColor(objTextBack, 0, 0, 0);
    ascent(i in 0..30){
        ObjRender_SetAlpha(objTextBack, 192/30*i);
        yield;
    }
    ObjRender_SetAlpha(objTextBack, 192);

    // Prepare text object. We will use render priority 83.
    let TEXT_MARGIN_LR = 8; // Left and Right Margins.
    let TEXT_MARGIN_TOP = 6; // Top Margin
    let TEXT_MAXWIDTH = TEXTBOX_WIDTH - TEXT_MARGIN_LR*2;
    let objText = ObjText_Create();
    ObjText_SetText(objText, "Default[r]Default");
    ObjText_SetFontSize(objText, 15);
    ObjText_SetFontBold(objText, false);
    ObjText_SetFontType(objText, "Helvetica");
    Obj_SetRenderPriorityI(objText, 83);
    ObjText_SetFontColorTop(objText, 255, 255, 255); //Will be altered inside the event
    ObjText_SetFontColorBottom(objText, 255, 255, 255);
    ObjText_SetFontBorderType(objText, BORDER_FULL);
    ObjText_SetFontBorderColor(objText, 255, 255, 255);
    ObjText_SetFontBorderWidth(objText, 1);
    //ObjText_SetMaxWidth(objText, TEXT_MAXWIDTH);
    ObjRender_SetX(objText, GetStgFrameLeft() + TEXTBOX_BUFFER + TEXT_MARGIN_LR);
    ObjRender_SetY(objText, GetStgFrameTop() + GetStgFrameHeight() - TEXTBOX_HEIGHT - TEXTBOX_BUFFER + TEXT_MARGIN_TOP);

    return [objTextBack, objText, objImgLeft, objImgRight];
}

// Given an array of object IDs, destroys all of them
function DestroyDialogueEvent(objects) {
    ascent(i in 0..length(objects)) {
        Obj_Delete(objects[i]);
    }
}

// On player key press, wait specified number of frames
function EventWaitA1(frames) {
    while(GetVirtualKeyState(VK_OK) == KEY_FREE || GetVirtualKeyState(VK_OK) == KEY_HOLD){yield;}
    loop(frames){yield;}
}

// Timed wait for specified number of frames
function EventWaitA2(frames) {
    loop(frames){yield;}
}

// At start of event, wait for key to be released, wait for key to be pressed, and then wait specified number of frames
function EventWaitA3(frames) {
    while(GetVirtualKeyState(VK_OK) == KEY_HOLD){yield;}
    while(GetVirtualKeyState(VK_OK) != KEY_PUSH){yield;}
    loop(frames){yield;}
}

// Sets portrait to background
function SetPortraitToBackground(portrait) {
    ObjRender_SetAlpha(portrait, 192);
    ObjRender_SetColor(portrait, 192, 192, 192);
}

// Sets portrait to foreground
function SetPortraitToForeground(portrait) {
    ObjRender_SetAlpha(portrait, 255);
    ObjRender_SetColor(portrait, 255, 255, 255);
}
Summary
- Dialogue Systems are comprised of text and sprites
- Functions and Subroutines can be used to block execution of code
- Key states can be used to trigger dialogue progression
Sources and External Resources
N/A